Author: Dave Page
You may have heard the term 'spyware' and people saying that you need to take every precaution to avoid it; plus that it can also be really difficult removing spyware from your computer. Naturally, when you think of spyware, one of the first things that probably enters into your mind is someone invading your privacy - spying on you. In a technological sense, that is exactly what is happening. There has been such a proliferation of spyware recently that it is not something that should be taken lightly or ignored.
If you are not completely sure what spyware is, it can be defined as a type of software that is used by individuals or companies to gain access to information about you. Whether it is your surfing habits or your private information that is being monitored, spyware is an invasion of your privacy. In many instances, spyware will also change the configuration of your computer, causing it to behave strangely.
Though people normally use spyware for malicious purposes, it is many times installed on your computer with your consent. When you download many of the readily available 'freeware' programs, often you get more than you anticipated. Most times, this situation can be avoided by simply taking a moment to read the user agreement. It is often clearly stated that you agree to install third party software along with the free software.
Sometimes, though, the user agreement may not state that you are downloading third party software so it is also important to carefully read stipulations on the site where you download the software. Also, you should never download software from anyplace other than the original site or a trusted source. If you download software from a torrent site, you are virtually asking for your computer to be infected with spyware.
Spyware can cause all types of problems for your system. Your operating system files may be damaged or the resources may be overloaded, which can cause your computer's performance to slow down dramatically. Plus, certain types of spyware make it very easy for someone to steal your identity. While some companies simply want to spy on your surfing habits to improve sales demographics, the intentions of other abusers of spyware are not so transparent.
One of the most common types of spyware simply displays unwanted advertisements based on your surfing habits. Other more obtrusive types of spyware will hijack your browser's start page and add unneeded components to your system which may cause your computer to crash. Some of the most malicious types of spyware take control of your computer and use it as part of a network to gain control of other computers containing sensitive data.
One of the most important things to understand about keeping your computer free from spyware is that you should have a complete understanding of exactly what you are installing on your computer before completing the install. Read all enclosures and agreements carefully and only download software from trusted sites. If you follow these basic guidelines, you will have a much easier job preventing spyware from taking over control of your computer.
Friday, June 20, 2008
The World of Computer Speakers
Author: David H. Urmann
The most well known speaker in the world is out to give you yet another stunning performance. Computer speakers are such in demand in the market now. People using the internet, teenagers hooked with their on line games are the primary users of this electronic device. Their ground-breaking inventions and improvements will surely fascinate you.
A computer speaker is a built-in device that generates the sound from the computer. This kind of speaker is designed for PCs or personal computers. A lot of different computer speakers can connect via a jack, USB, RCA connectors, socket and plug. They are commonly designed as attractive, small and versatile.
There are also durable brands that are a bit expensive but are worth the price. Computer speakers can also be used when you are listening to music, playing 3D games or watching a number of movies.
Moreover, computer speakers are in demand in the market now. People using the internet, teenagers hooked with their on line games are the primary users of this electronic device. Even the movie addict who only knows how to download their favourite and the latest movie on the net is obsessed with the idea of a good sound woofer in order to imitate their home theatres.
External speakers or the multimedia speakers are commonly equipped with a low-power internal amplifier. The standard audio connection is a stereo jack pug about 3.5 mm and coloured green for computer sound cards. Some uses an RCA connector for input but there are also types who use USB speakers which are provided with 5 Volts at 200 milliamps which can allow about a half watt of output power. They usually have an equalization feature for treble controls and bass. Computer speakers usually range from low quality, high-quality and expensive speakers.
Computer speakers vary greatly in price and quality and the typical speakers that are included in the computer package is mediocre in performance and sound quality.
Listed below are some of the types of computer speakers
• Logitech Z_2300: This computer speaker is loud and nice. The sound comes out without distortion or losing clarity. This is even at a high volume level. The Z_2300 computer speaker has a two forty watt satellite and a one hundred twenty watt subwoofer. The Logitech computer speaker is an adapter speaker that can be used in DVD players as well as in gaming.
• Lansing VS2421: This brand of computer speaker is a high-quality basic speaker. The VS2421 has a thirty five Hz to twenty Hz for a full volume sound. It also uses twenty eight watts of electricity. This computer speaker device has a hardwire remote control used for controlling the treble and volume. Its hardware remote control includes a mute button, auxiliary input both for CD players and MP3s, as well as a microphone.
• Logitech Z_5500: This brand of computer speaker device consists of six speakers as well as a subwoofer. This five hundred five watt Logitech speaker is the best speaker for movie buffs and computer gamers. The Z_5500 speaker has a very high volume level and bass control. It can also be used in CD players as well as portable DVD players.
• Tritton USB Portable Computer Speaker: This computer speaker is especially made for portable computers. Tritton USB speakers have a fixed subwoofer that is suitable both for low and high volume control. This type of speaker does not need power adapters or even batteries. This USB portable computer speaker is powered by fifty centimeters of USB cable. This speaker uses about one hundred ten to two hundred watts.
• Edifier S2.1 computer speaker: This computer speaker features three different inputs such as analog and two digital inputs. The two digital inputs inside this speaker consist of one optical and one coax. The S2.1 speakers have a wired remote, LFE, treble and loudness volume. This computer speaker comes with four meters of optical cable and three meters of cable stereo analogue. It also has a decent high output for a sixty-five inch subwoofer. Edifier speakers have removable grills. The S2.1 has a maximum of one thousand power consumption.
• Groove PM21Computer Speakers: This speaker brings high-qualities of sound. It also mixes great sound to PCs and laptops. PM21 has a simple set up composed of three speakers as well as a modern design for flat monitors. It also includes a compact style that is suitable for travelers. This speaker is around two hundred twenty watts. Groove computer speakers bring a clear and nice sound to every computer.
• Cyber Acoustic 3001 Personal Computer Speakers: This kind of speaker for computers is the best and most affordable three-piece subwoofer for computers. It has a suitable desktop volume level and cloth grill coating. The speakers have three poly carbons, two high rate satellite radiators plus a high quality woofer.
• Labtec Pulse 430 Personal Computer speakers: The Pulse speaker has a tall three-piece audio that is cheap and very convenient for everyday usage. It also has a great subwoofer for throbbing bass as well as packed in satellite speakers. This three-piece powerful speaker provides realistic, dynamic, powerful and crystal clear sounds. Labtec Pulse features a USB, jack, socket and plug connector.
• Hidden Spy Computer Speakers: This speaker delivers high quality, powerful clear sounds. Computer speakers of this brand have an attractive style as well as coat cover speakers. It has a USB cable and jack connection. Hidden Spy speakers are around one hundred ten watts to two hundred twenty watts.
Thus, when it comes to recently featured computer speakers, Altec- Lansing is well known and respected. This is due to the long years it has put in developing the best sound woofers for your computers.
In fact, Altec-Lansing released their new high-end computer speakers. It has a simple, elegant style and complete with fantastic sounds, making it perfect for people who only seek quality computer speakers for their computers and audio devices.
Their FX series possess a remarkable sound from the FX satellites' REAL two-way system. This means that each satellite has two drivers that are both active. The beauty of this new innovation is that the FX 4021 and FX 5051 can be mounted on the wall. Thus, the first 5.1 system of FX5051 can offer the advantage of having a USB plug -and -play connectivity, which adds to its ease of use.
Comparing the FX 4021 and the FX 5051 specifications, with regards to its unique features are as follows:
FX 4021 uses an isobaric subwoofer with dual 5.25 inches woofers. Aside from this, the rest of the specifications are already similar to the FX 5051. Hence, the FX5051 is similar on some specifications with the FX 4021 but it has a better isobaric subwoofer with dual 6.5 inches woofers, a USB 5.1 connectivity, digital hardwired controller for stand-by, master volume, bass, treble and centre controls.
It also needs a minimum system requirement of a personal computer with a 500 MHz processor, Operating system of Windows 98SE, 2000, ME or XP, a minimum Random Access Memory of 64 megabytes, music and game title that is encoded for 5.1. This is along with an available Universal Serial Bus or USB port.
Both models have a two- way satellite that can be mounted to the wall. Plus, each satellite possesses the following:
• a 40 mm midrange driver
• 18 mm tweeter
• wireless remote for controls
• built in cable management
• conveniently located auxiliary input for mp3
• portable Compact Disc players
• Head Phone jack
Another innovative invention is the FX6021 which has a so called InConcert technology. This can be for music, home theatre or gaming addicts.
Moreover, this technology can deliver a crisp, clean, full- volume sound that feels like its covering every bit of you. This can even express s sound that is in a straight forward manner, not up and down. This means that the sound is clearer and uncluttered by the reflections of the ceiling, wall or floor.
Aside from this, it also has two super slim satellites that feature 12 neodymium one-inch micro drivers. Each micro driver is supported by its very own distinct amplifier. A 6.5 inches subwoofer accomplishes the sound through its low- frequency and a full- throated bass.
Comparing this high end speaker, FX6021, with a high performance speaker like the VS 4221 that possesses an impressive bass capable of registering on your Richter scale, they are still not on equal footing. This is due to the fact that the VS4221 has a 3 inch driver for a warm, uniform sound, capable of surrounding an entire room. The stunning result would be robust, rich sounds that only very few woofers can match.
Thus, a wide selection of speakers is now available and they differ depending on the user's demands and needs. With this, it is imperative that you are constantly updated on the types of computer speakers available in the market. This way, you will be able to keep in touch with how the evolving technology can work to your advantage.
Monday, June 16, 2008
Tips dan Trik Reset Printer Canon
Dapet dari macem-macen sumber terus kumpulin di sini aja kali yah. Sapa tau ada yang perlu.
Untuk Canon tipe IP 1880 caranya sama juga seperti printer Canon yang sebelumya yaitu:
1. Matikan printer
2. Cabut kabel power
3. Tekan dan tahan tombol power
4. Pasang kembali kabel power (tobol power masih ditekan dan ditahan ya...)
5. Tekan tombol RESUME 2X
6. Lepaskan tombol power
7. Selesai
Biasanya setelah di reset, komputer akan mendeteksi printer sebagai printer baru (lihat di Control Panel / Printer & Fax). Namun sayangya Indikator tinta pada tank printer tetap terdeteksi seperti yang lama. Untuk mereset indikator tinta agar terlihat penuh lagi kita butuh software resetternya. Silahkan donlot DISINI NIH. Semoga bermanfaat yah.
Canon GENERIC “S” SERIES RESET CODE
Waste Ink Counter Reset.
1. Turn off the printer.
2. Press and hold the RESUME button, then press and hold the POWER button.
3. Release the RESUME button, Next press and release the RESUME button two(2) more times in
4. succession. Note: you are still holding the POWER button). The printer’s carriage will “reset”
5. or move momentarily. If the above was properly performed the printer will enter the
6. “Service Mode”.
7. Press the RESUME button 4 times, this will select the clear waste ink counter function. The lamp
8. will alternate (change) color with each key press.
1. Service/Factory test printout, including ink sensor check.
2. EEPROM - Info printout.
3. EEPROM - Initialization.
4. Reset the Waste ink counter.
5. Printer model setting. (More selections beyond this point - However it is best leave them unaltered - You have been warned!)
After selecting the desired mode (eg 4), press the POWER button to “set” the change, and return to the top of the function selection menu. Press the POWER button again to restart the printer.
++++++++++
Canon i320, i255
Waste Ink Counter Reset.
Step 1 : Manual for service mode
1. Unplug power and USB.
2. Open door and hold power button.
3. Connect power.
4. Close door, then release power button.
or Step 1: Manual for service mode
1. Turn off the printer. And disconnect the printer cable.
2. Press and hold the POWER button, turn on the printer.
3. The indicator (L.E.D.) should be green.
4. Press and release the RESUME button , the indicator (L.E.D.) should be orange.
5. Press and release the RESUME button again, the indicator (L.E.D.) should be green.
6. Release both buttons.
step 2 : Software for Permanant
1. Reconnect the printer cable.
2.Open General Tools software and select (USB PORT)
3 .Choose (SET DESTINATION 1) And it should be reset.
Remark “After service mode Pls use software for permanent reset”
++++++++++
Canon PIXMA iP1000
Waste Ink Counter Reset.
Step 1: Manual for Service mode
1. Unplug power and USB.
2. Open door and hold power button.
3. Connect power.
4. Close door, then release power button.
step 2 : Software for Permanant
1. Reconnect the printer cable.
2.Open General Tools software and select (USB PORT)
3 .Choose (SET DESTINATION 1) And it should be reset.
Remark “After service mode Pls use software for permanent reset”
++++++++++
Canon PIXMA iP1500
Waste Ink Counter Reset.
Step 1: Manual for Service mode
1. Unplug power and USB.
2. Open door and hold power button.
3. Connect power.
4. Close door, then release power button.
step 2 : Software for Permanant
1. Reconnect the printer cable.
2.Open General Tools software and select (USB PORT)
3 .Choose (SET DESTINATION 1) And it should be reset.
Remark “After service mode Pls use software for permanent reset”
++++++++++
Canon i850, i950, S600
Start with the printer OFF
1. Hold down RESUME and then hold down POWER
2. release RESUME
3. press RESUME twice, then release POWER
4. Let green light blink until printer is done futzing
Select function with RESUME press POWER to execute:
presses - light color - function
Number of presses - light color - function
0 presses - green - Test print (or exit service mode on i960)
1 press - orange - EEPROM info print (plus grid nozzle diagnostic on i960)
2 presses - green - EEPROM initialize
3 presses - orange - Reset waste ink counter
++++++++++
Canon S450 Printer
1: Power off printer
2: Hold Resume button then press and hold POWER, the beeper will sound once.
3: Hold POWER and release RESUME
4: Press RESUME twice
5. Release Power button
6: When the indicator lights steady, press RESUME three(3) times. The indicator should be orange.
7: Press Power to set data
++++++++++
Canon BJC 1000 Serie
1: Remove Cartridge
2: Unplug the AC Power Cord
3: Hold down the RESUME button
4: Release RESUME after plugging in the AC Power cord.
5: Press the RESUME once within 5 seconds and release the RESUME .
6: Press and HOLD RESUME for two seconds or more and release it.
7: Press and HOLD RESUME for two seconds or more and release it.
8: Unplug AC Power Cord to set data.
++++++++++
Canon BJC-2000 BJC-2100 Serie
1: Remove the Cartridge
2: Unplug the AC Power Cord
3: Close Front access panel
3: Hold down the RESUME/RESET button and plug in the AC power cord
4: Release RESUME/RESET after plugging in the AC Power cord.
5: Press the RESUME/RESET once within 5 seconds and release the RESUME/RESET .
6: Press and HOLD RESUME/RESET for two seconds or more and release it.
7: Press and HOLD RESUME/RESET for two seconds or more and release it.
8: Unplug AC Power Cord to set data.
++++++++++
Canon BJC-210 BJC-240 BJC-250 BJC-255 BJC-265
Canon BJC-4100 BJC-4200 BJC-4300 BJC-4400 BJC-4550 BJC-4650
Unplug Power Cord
Hold POWER and RESUME buttons
Plug in Power Cord
Release buttons
Open front door of printer
Hold the CARTRIDGE and RESUME buttons
Press POWER
Release all buttons after the beeps
Press CARTRIDGE once
Press RESUME
++++++++++
Canon BJC-5000
1: Power off printer
2: Press and hold RESUME then press POWER, The indicator will start blinking.
3: While the indicator is blinking , Press RESUME twice then Wait until the printer beeps to indicate service mode
5: When the indicator lights steady GREEN, press RESUME four(4)times. The indicator should be GREEN.
6: Press Power to set data
Service Test Print
1: Power off printer
2: Press and hold RESUME then press POWER, The indicator will start blinking.
3: While the indicator is blinking , Press RESUME twice then Wait until the printer beeps to indicate service mode
5: When the indicator lights steady GREEN, press RESUME two(2)times. The indicator should be GREEN.
6: Press Power to Print
Nozzle Print
1: Power off printer
2: Press and POWER, until the printer beeps and release.
Demonstration Print
1: While the printer in ON , , Press and hold RESUME until the printer plays a melody of beeps.
++++++++++
Canon BJC-5100
Self Test
Switch Printer off. Hold Power for 1 beep.
Waste Counter Reset
1: Power off printer
2: Press and hold RESUME then press POWER, The indicator will start blinking.
3: While the indicator is blinking , Press RESUME twice then Wait until the printer beeps to indicate service mode
5: When the indicator lights steady GREEN, press RESUME four(4)times. The indicator should be GREEN.
6: Press Power to set data
Service Test Print
1: Power off printer
2: Press and hold RESUME then press POWER, The indicator will start blinking.
3: While the indicator is blinking , Press RESUME twice then Wait until the printer beeps to indicate service mode
5: When the indicator lights steady GREEN, press RESUME two(2)times. The indicator should be GREEN.
6: Press Power to Print
Nozzle Print
1: Power off printer
2: Press and POWER, until the printer beeps and release.
Demonstration Print
1: While the printer in ON , , Press and hold RESUME until the printer plays a melody of beeps.
++++++++++
Canon BJC-3000 BJC-6000 BJC-6100 BJC-6200 S400 S450 F300 F600 F620
Canon BJC-7000 BJC-7100 BJC-8000 BJ-F800 i6500
1: Power off printer
2: Hold Resume button then press and hold POWER, the beeper will sound once.
3: Hold POWER and release RESUME
4: Press RESUME twice
5: When the indicator lights steady, press RESUME three(3) times. The indicator should be orange.
6: Press Power to set data
++++++++++
Canon BJC-600 BJC-600e BJC-610 BJC-620
1: Unplug Power Cord
2: Hold POWER and FF and Print Mode buttons
3: Plug in Power Cord
4: Release after the beeps
++++++++++
Canon BJC-50 BJC-55 BJC-80 BJC-85 M40 M70
1: Unplug Power Cord
2: Hold POWER and RESUME buttons
3: Plug in Power Cord
4: Release buttons after the printers starts up
5: Hold CARTRIDGE and RESUME
6: Press POWER
7: Release all buttons after the beeps
8: Press CARTRIDGE 16 times
9: Press RESUME
10: Unplug the Power cord
++++++++++
Canon BJ-30 BJC-35v BJC-70
F14 Error Reset
1: Unplug adapter
2: Hold POWER
3: Plug in ADAPTER
4: Release POWER after printer starts
5: Hold FF and MENU and press POWER
6: Release after beeps
7: Press <> Cartridge until 1A is displayed
8: Press ONLINE
9: Press POWER to shutoff printer
10: Unplug printer then re-plug printer
++++++++++
Canon BJ F900, F890, F700, F500, S900, S820, S750 and S520
Turn off the printer.
Press and hold the RESUME button, then press and hold the POWER button.
Release the RESUME button, then press and release the RESUME button two more times in succession. (youre still holding the POWER button during this). The printer mechanics will move momentarily.
You are now in Service mode.
Pressing the RESUME key will select a function; for example, pressing RESUME 4 times will select the clear waste ink counter function. The lamp will alternate color with each key press.
1. service/factory test printout, including ink sensor check
2. EEPROM info printout
3. EEPROM initialization
4. Clear the waste-ink counter
5. Printer model setting. (more selections beyond this- leave this alone)
After selecting mode, press the POWER button to commit the change, and return to the top of the function selection menu. Pressing the POWER button again turns off the printer for a resta
++++++++++
Canon S9000, S300, S400, i550, i560, i850, i860, i865, i9100, i9950, PIXMA iP3000 above,
1. Turn off printer
2. Hold down Resume button and press Power button.
3. Keep holding down Power button and let Resume button go.
4. Press Resume button 2 times then let BOTH buttons go.
5. Green lights will flash and then stop blinking.
6. When green lights are solid, press the Resume button 4 times.
7. Press the Power button and the printer should turn off, if not, press the Power button once more.
8. Your printer should respond as normal.
+++++++++
Canon S900, S820, S750, S520
1. Turn off the printer.
2. Press and hold the RESUME button, then press and hold the POWER button.
3. While still holding the POWER button, Release the RESUME button, then press and release the RESUME button two more times in succession.
4. The printer mechanics will move momentarily. You are now in Service mode. Release the Power Button.
5. Pressing the RESUME key will select a function; for example, pressing RESUME 4 times will select the clear waste ink counter function. The lamp will alternate color with each key press.1. Service/factory test printout, including ink sensor check
2. EEPROM info printout
3. EEPROM initialization
4. Clear the waste-ink counter
5. Printer model setting. (more selections beyond this- leave this alone)
6. After selecting mode, press the POWER button to commit the change, and return to the top of the function selection menu. Pressing the POWER button again turns off the printer for a restart.
++++++++++
Canon S9000
1. Turn off printer
2. Hold down Resume button and press Power button.
3. Keep holding down Power button and let Resume button go.
4. Press Resume button 2 times then let BOTH buttons go.
5. Green lights will flash and then stop blinking.
6. When green lights are solid, press the Resume button 4 times.
7. Press the Power button and the printer should turn off, if not, press the Power button once more.
8. Your printer should respond as normal.
+++++++++
Canon MPC190
Reset Waste Ink
1) Enter SERVICE MODE.
By pressing Menu, Copy, Scan, Copy, Copy
2) Select TEST MODE.
3) Select [8] PRINTER TEST in TEST MODE.
4) Select 3. [EEPROM CLEAR].
5) Select 0. [INK COUNT].
6) Press the [Set] key.
7) Press the [Stop/Reset] key (returning to the state of 3)), and then press the [ON/OFF] key.
Thursday, June 12, 2008
Google Sitemap - Cara Cepat Terdaftar Di Search Engine
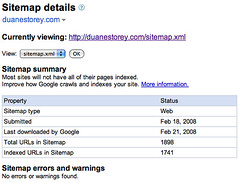
Setiap orang yang baru saja membuat website, tentu berharap website segera masuk dalam haill pencarian search engine. Muncul dihasil pencarian Search engine sebenarnya tidak sulit, dengan sendirinya website Anda akan terdaftar di search engine, tetapi bila Anda tidak melakukan apa-apa, maka website Anda akan lebih lama terdaftar disearch engine (bisa berbulan-bulan).
Untuk mempercepat website Anda terdaftar di search engine, sebenarnya tidak sulit. Salah satu cara yang cukup populer adalah dengan menggunakan Google Sitemap. Google Sitemap merupakan suatu layanan dari Google untuk memudahkan suatu website terindeks di Google. Dengan Google Sitemap website Anda akan lebih cepat terindeks di Google.
Cara menggunakan Google Sitemap :
1. Buat Account Google Sitemap.
2. Buat Sitemap untuk website Anda. Anda bisa menggunkan layanan website ini untuk membuatnya. Sitemap Builder
3. Upload sitemap.xml ke root directory (sama dengan file index Anda) pada website Anda.
4. Login ke Account Anda dan masukkan alamat website Anda.
5. Google akan meminta alamat sitemap Anda.Misalnya : http://www.siteanda.com/sitemap.xml.
6. Setelah itu Sitem Anda harus di Verifie, untuk klik pada Verified pada Sitemap Anda.
7. Pillih cara Anda untuk Verified situs Anda. Ada 2 cara untuk melakukannya :
a. Menambah META TAG pada file index Anda.
b. Menambahkan file kosong yang namanya sudah ditentukan Google.
Untuk lebih mudahnya pilih cara b. Untuk membuat filenya, buka Notepad, kemudian Save dengan nama yang diberikan Google. Jangan lupa pilih All Files pada file type.
Nah, sekarang Anda tinggal menunggu situs Anda, diindeks oleh spidernya Google.
Agar Diterima Submit Website Di DMOZ.ORG

Untuk meningkatkan pengunjung website, kita perlu menambah website lain yang menampilkan link ke website kita. Salah satu cara yang paling mudah adalah dengan submit website kita ke web directory yang menawarkan free submmit. Salah satu directory yang sangat bagus dan terkenal adalah DMOZ.ORG.
DMOZ merupakan sebuah web directory yang mengAndalakan tenaga manusia untuk meriview semua website yang yang masuk, jadi kualitasnya terjaga. DMOZ juga digunakan oleh Google untuk membuat Google Directory. Struktur dan daftar website di Google Directory sama dengan yang di DMOZ. Oleh karena itu jika Anda mempunyai website jangan sampai tidak submit ke DMOZ.
Agar diterima di DMOZ tidak mudah, tidak sembarang website bisa masuk. Website yang berisi banyak iklan pornografi, pasti langsung di tendang ! Supaya bisa diterima di DMOZ, saya punya beberapa tips.
Tips supaya bisa di terima submit di DMOZ :
1. Jangan pasang iklan dan Affiliate program pada website Anda, termasuk Google Adsense. Anda bisa memasang iklan setelah diterima di DMOZ.
2. Buatlah content website Anda sebagus mungkin. Janggan su bmit website yang baru jadi dan isinya masih minim. Sebelum submit ke DMOZ isi website Anda dengan artikel-artikel berkualitas dan original untuk meningkan kualitas website Anda.
3. Fokuskan bahasa.
Jika nantinya website Anda menggunkan bahasa campuran9Indonesia & Inggris), saya sarankan foukuskan dulu ke satu bahasa dulu. Dengan memfokuskan ke satu bahasa akan memudahkan Anda dan editor DMOZ memasukan website Anda ke direktori Indonesia atau Inggris. Perlu diingat meskipun saat submit Anda memilih kategori berbahasa Inggris, editor DMOZ kwmungkinan akan memindahkan website Anda ke direktori Indonesia jika website Anda berbahsa Indonesia.
Pengaruh bahasa ke depannya.
Pengaruh diterimanya website Anda pada direktori Indonesia atau Inggris sangat berngaruh pada target pengunjung website Anda, terutama pengunjung dari Google.
1. Website Anda akan dikategorikan website berbahasa Indonesia oleh Google, oleh karena itu website Anda akan mendapatkan priotrikan lebih baik pada hasil pencarian yang dilkaukan melalui www.google.co.id tetapi tidak di www.google.com.
2. Jika website Anda nantinya akan di pasang Google Adsense, saya sarankan website Anda menggunkan bahasa Inggris supaya Adsensenya bisa muncul.
Untuk diterima di DMOZ tidak secepat dan semudah yang Anda banyangkan, Anda harus menunggu anatara 3 sampai 6 bulan ! DMOZjuga tidak akan memberitahu apakah website Anda diterima atau di tolak. Jika website Anda bisa diterima di DMOZ, makaa Anda pasti sangat sangat beruntung sekali !
Subscribe to:
Posts (Atom)
